Tag Archives: dinner

Thriving Thursday: Mom’s Shepherds Pie

Happy Thursday to you all! It’s almost the weekend and I’m excited about it. This last couple months has been absolutely crazy at work. It’s really wonderful to see so many people starting their path to health but I’m a little glad that it’s starting to taper now. I was starting to miss my relaxation (and cooking) time. So here is a great recipe directly from my Momma’s kitchen.

My mom is a fabulous cook. She claims to hate it but how can you hate something you’re so good at?? I think she gets tired of cooking every single night (who wouldn’t) but goodness knows we would have been a MUCH less healthy family without her daily meals.

She is one of those people who can whip up a meal when the fridge and pantry are completely empty. If friends stop by for a chat, she has the most creative and delicious appetizers on the table within 5 minutes. She has mastered the art of feeding AND socializing with people. Those who have tried it know how hard that can be.

She taught me this recipe before I left for college and it quickly became my signature dish. She uses mashed potatoes from the box (understandable with 4 kids and no time) but I love mashing potatoes. They taste better and I get to let out my pent-up aggression on them. So I turned to my friend Alex for some further input. She is also an amazing chef and trained in the art of food.

So here is my combination from the two lovely ladies. My mom’s was quicker but slightly healthier and Alex’s was a little more time-consuming but richer and more savory.

ShepherdsPie-Published

Mom’s Shepherds Pie

Note: This is a delicious dish but if you’re trying to lose weight, do not eat it for dinner. You don’t want the potatoes sitting in your stomach all night. Unless you use the energy, it will turn into fat.

Ingredients:

  • 5 medium potatoes
  • 1 cup organic butter
  • 1 cup milk (unsweetened almond, coconut, whatever…)
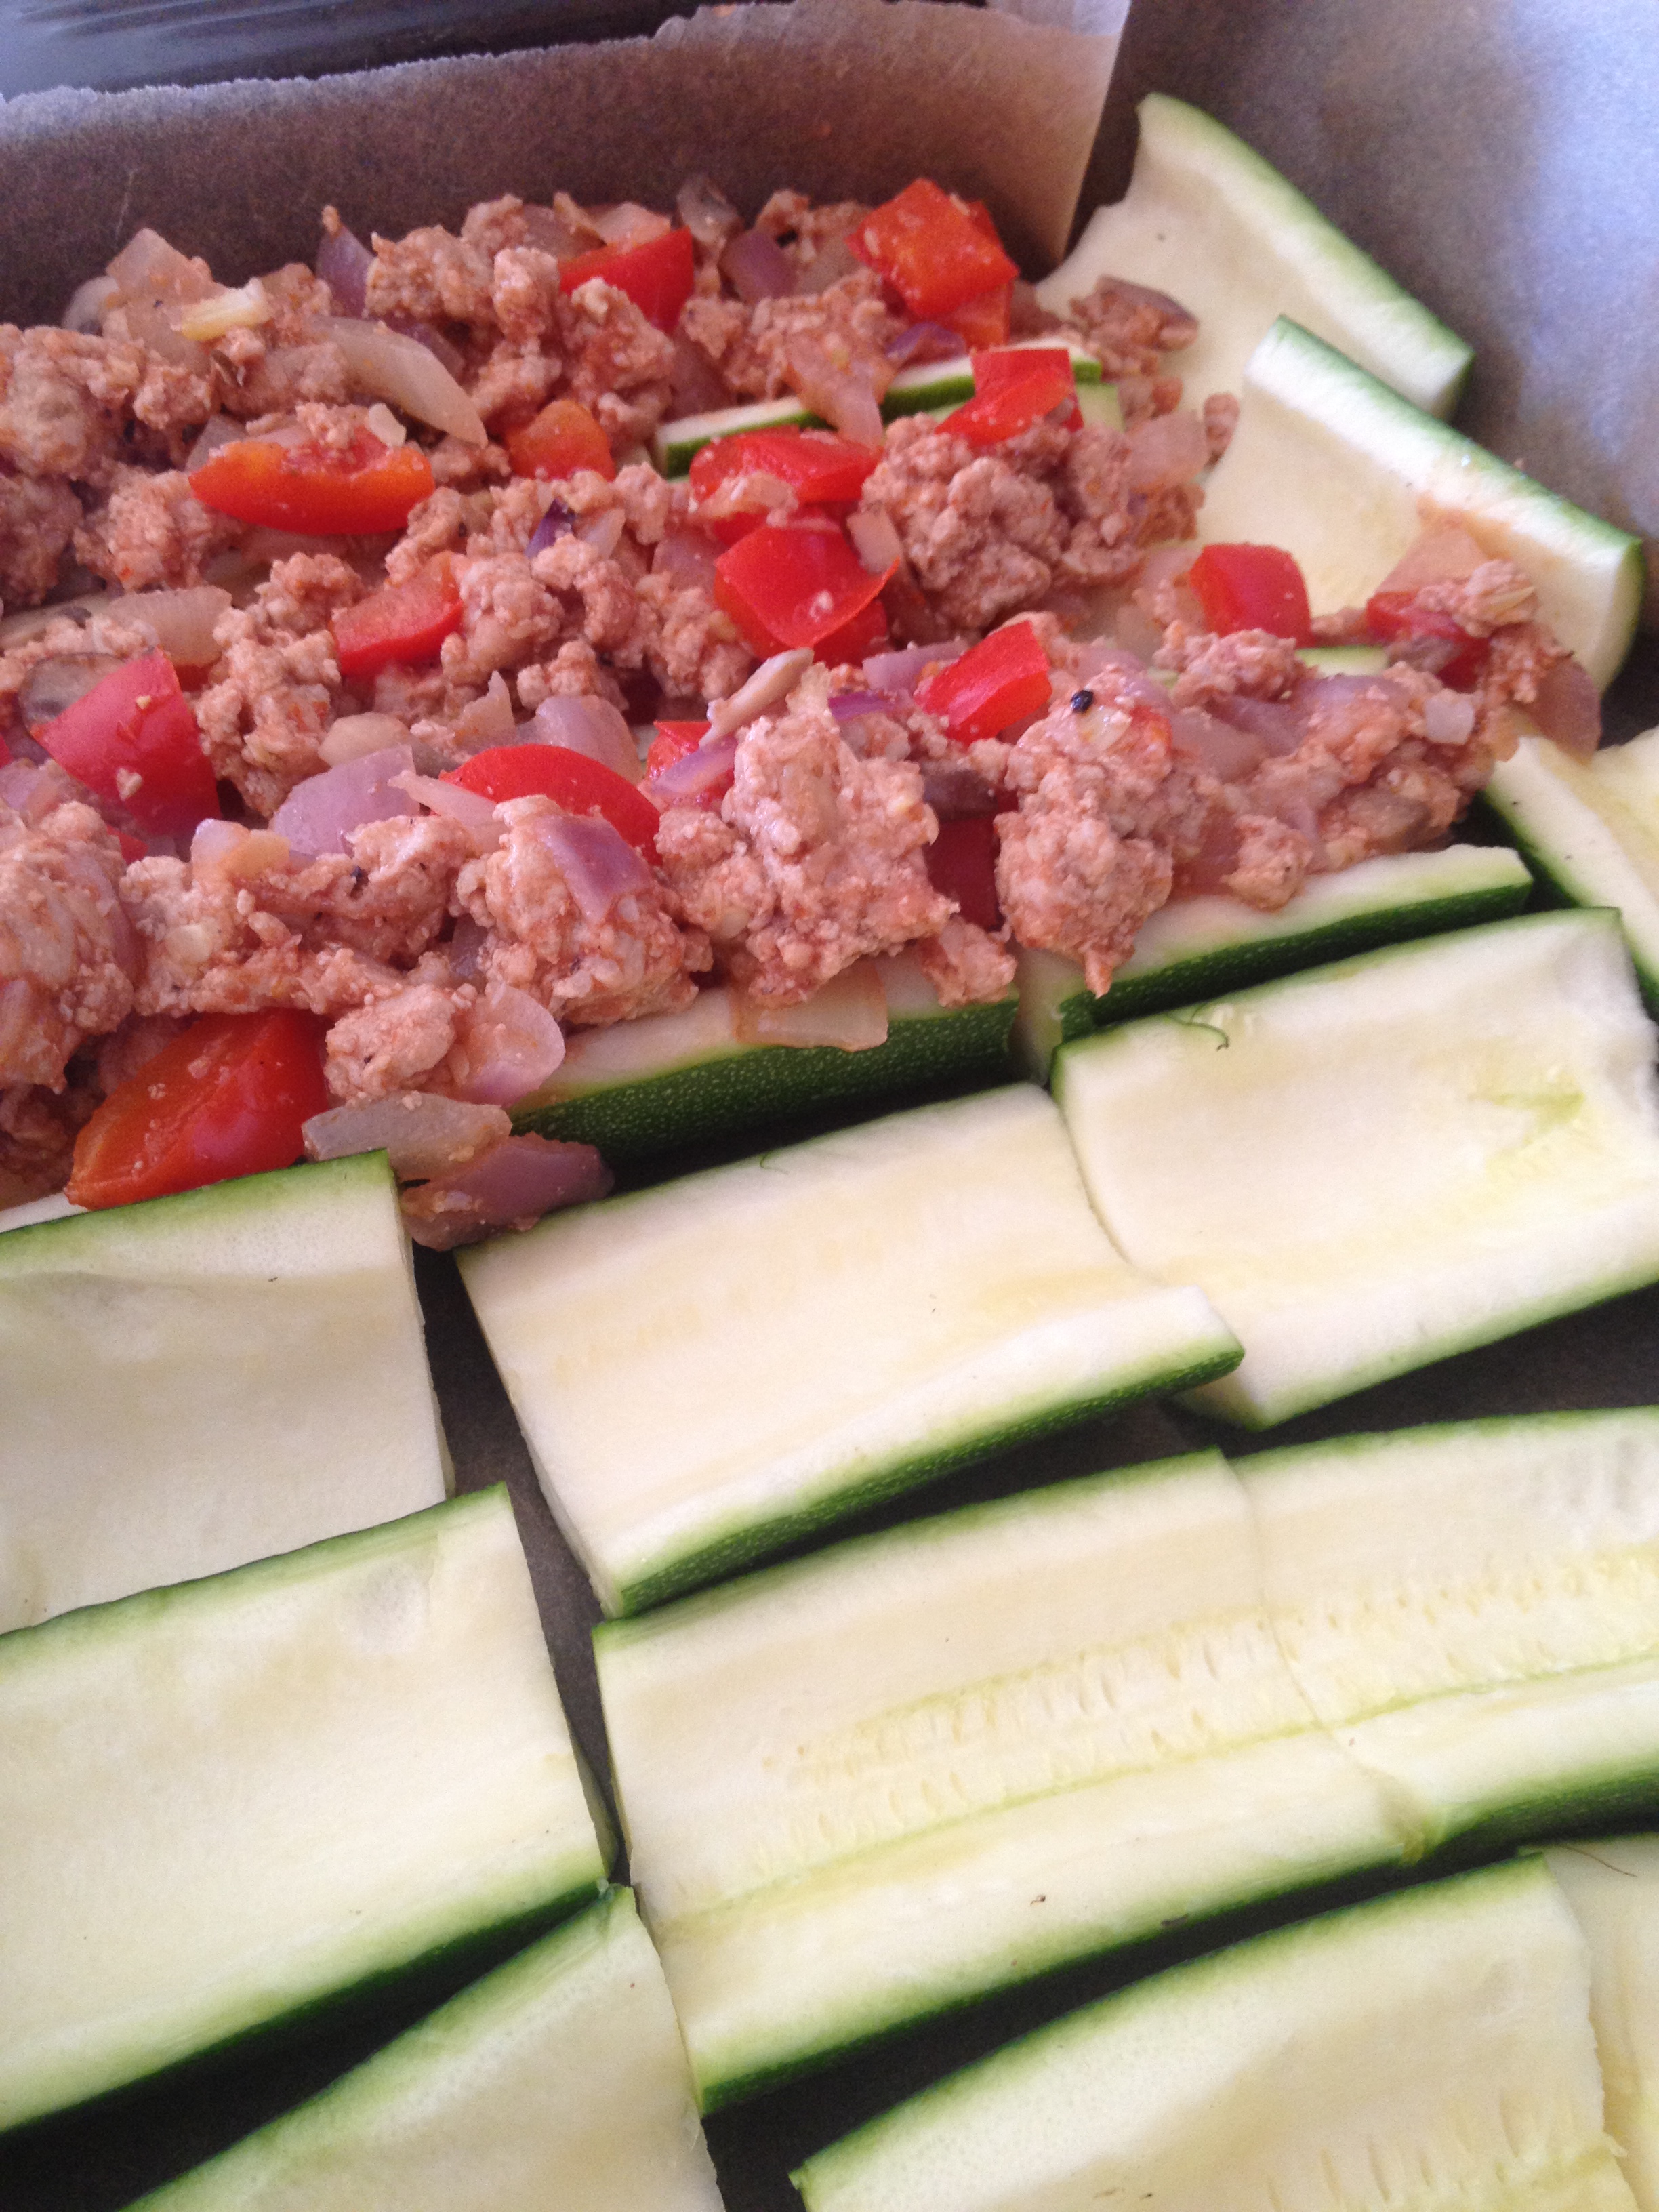
  • 1.5 lbs ground turkey
  • 2 Tbsp high heat oil (like coconut or grape seed)
  • 1 onion
  • 3 carrots
  • 1 zucchini
  • 4 cloves garlic
  • 1 cup gravy (I use Bisto but it contains trace gluten so be careful)
  • salt and pepper

Instructions:

  1. Preheat the oven to its lowest setting.
  2. Chop potatoes into small pieces. Boil them in a large pot of water until soft when stabbed with a fork.
  3. While they’re boiling, chop the onion, carrots, and zucchini.
  4. Drain the potatoes and mix in a large bowl with butter and milk. Mash them all up! Set aside.
  5. In a large pot (yes a large pot) sauté the onions, carrots, and minced garlic on medium heat. Cook until onion is transparent, about 5 minutes.
  6. Add turkey and zucchini to the skillet. Cook for 5 minutes then add gravy. Continue to cook until meat is browned.
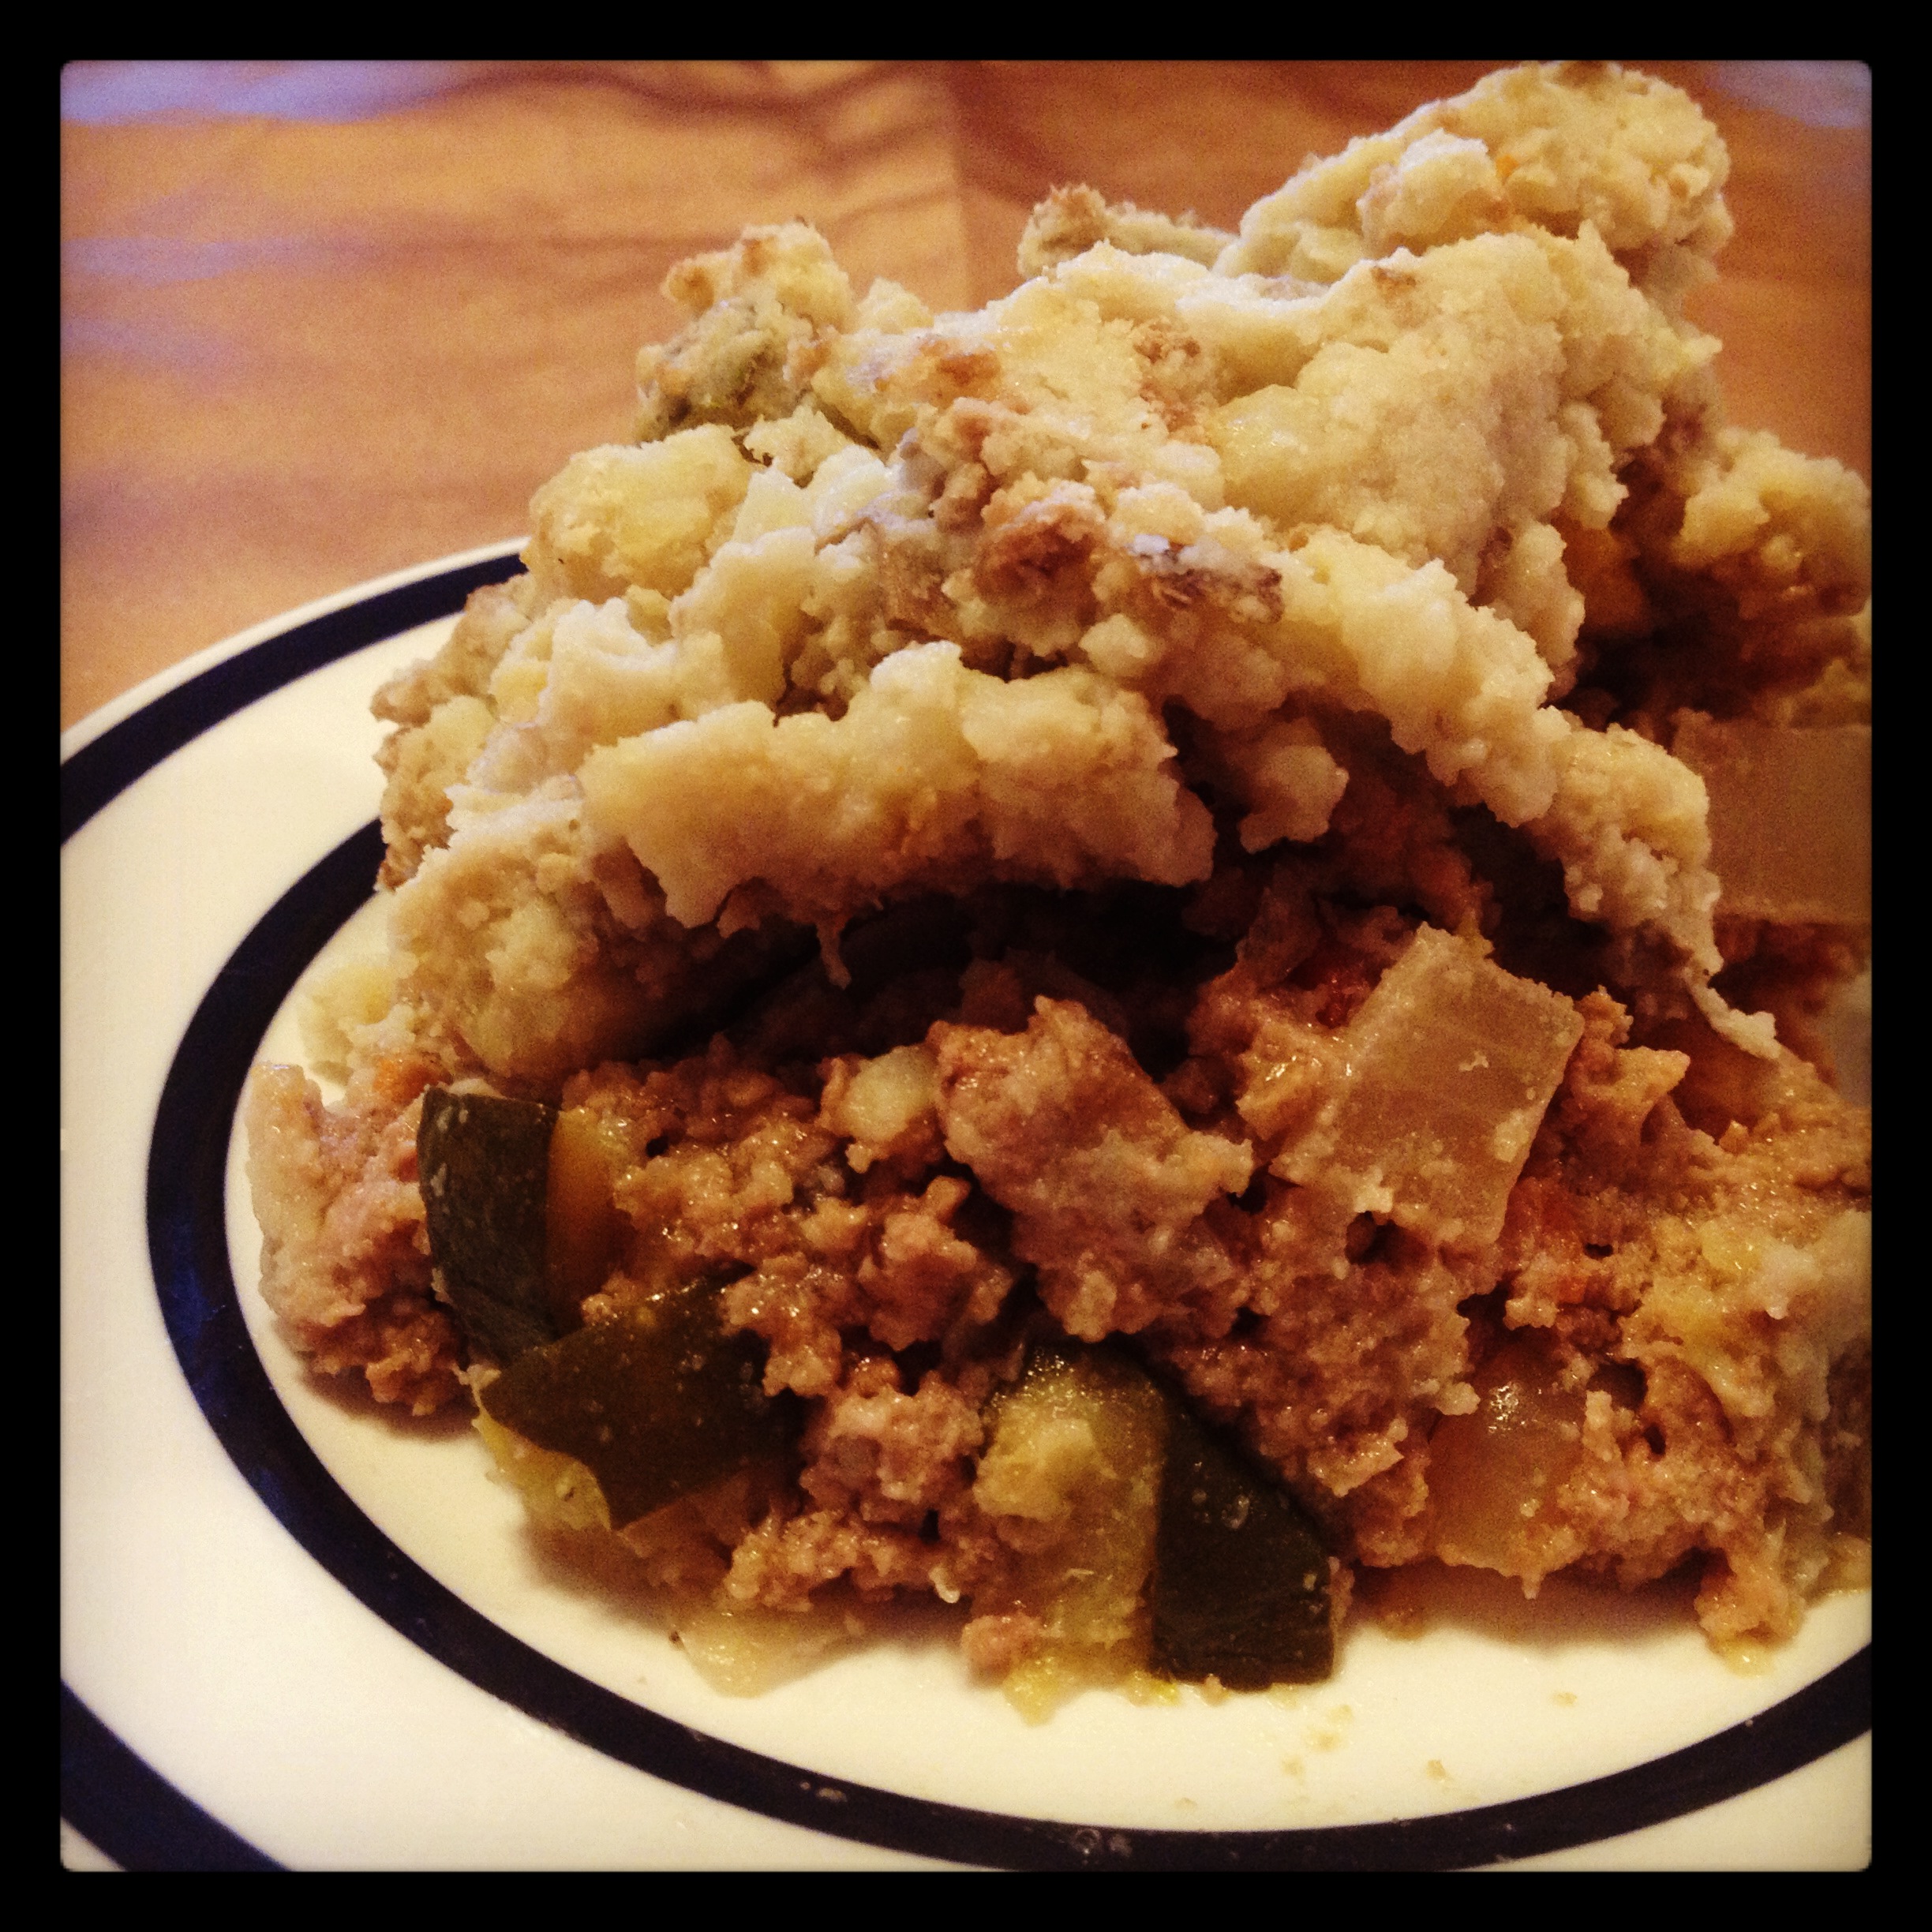
  7. Spread out the turkey mixture evenly in the pot then layer the potatoes on top.
  8. Heat in the oven for 5 minutes to let juices mix.
  9. Enjoy!

I hope you’re all having wonderful days. Love and a grin. – Ash


DIY Friday: Meal Planning Board

So you’re trying to eat healthy? I bet you have tons of people in the wellness community telling you “it’s really not that expensive!” Well they are wrong. Eating healthy can be VERY expensive. To keep the cost manageable you have to do a lot of planning. You have you cook most of your own food and you can’t have any food waste. Unless you plan, IT IS time-consuming and expensive.

Mike and I have been gradually increasing our health factor over the last several months while trying to keep costs low. We have set up a system where, whenever either of us buys food, we put the receipt on the coffee table for the other to review. It holds us accountable and makes us analyze where money could be better spent.

Then I meal plan. I’m very organized and love to plan ahead so this isn’t too hard for me but I was lacking the necessary tools. That’s why I made this bad boy. My meal planning board.

photo 1 copy


My dinner system:

  • Cook double-portions every other day. This means only cooking from scratch 3 times a week! I cook half the meal only partially so it’s not overcooked when I reheat it for dinner the next day.
  • Eat leftovers on the days I don’t cook.
  • Have our “vacation meal” on the seventh day.

It’s quick and means that I can buy more in bulk. Our breakfast is the same every morning (Grainless Granola) and each of us takes care of our lunch separately. It’s a pretty nifty system but I was getting really confused about which meals I was going to cook and which food I needed on my weekly grocery shop.

So during our Simple Sunday this past weekend, the weather was nice enough to paint out on the porch. I finally did my Meal Planning board and I love it!

Supplies:

  • Pretty frame (mine was $5 at Goodwill)
  • Spray paint (for color)
  • Spray paint (for chalk or whiteboard coating)
  • clothespins
  • some cardstock to label the pins
  • fabric to hold the labels
  • hot glue gun
  • a little sandpaper to prep the frame glass
  • painters tape (if you want to do a pattern)
  • an old sheet to protect your floor

Instructions:

photo 2^ Make sure you have a surface to stick the pins to. This frame had lots of dips in it so I blocked it out with some chips of cardboard I had in the recycling bin.

photo 3^ Separate the frame and glass. Sand the glass so it will hold the paint. Spray down all pieces with however many coats they need. *I started with chalkboard paint but it didn’t work all that well. I went back and exchanged it for whiteboard paint and repainted the glass.

photo 4< If you want to paint a pattern, wait until the base layer is dry and then tape it off and spray. *I originally had yellow stripes in mine but it was just too much with the raised dots AND baby yellow. After I finished it I went back and repainted it all white.

Stick the clothespins down with hot glue. If that doesn’t hold, graduate to the messier but much stronger Gorilla Glue.

photo 2 copy^ Cut out your cardstock. And write out any of your favorite dishes. Hot glue your fabric pockets to store them in. Then label the pins with the same cardstock. Mine are for each day of the week and then Snacks to take to work for that week. Here’s the template I made for my labels:  MealBoardLabels

Another idea, for complicated meals, write the ingredients on the back of the card so you don’t have to look back to the cook book every time.

photo 1 copy

And now you have a meal planning board! I’ve only been using mine for a week and I already love it. It takes the strain out of meal planning and makes cooking SO much easier. I will say it looks a little sad and bland with all the white and gray but I’m hoping I can paint the walls our next kitchen so it will just be a pretty accent on a sunny yellow wall. 🙂

Let me know if you have any questions. And HAPPY FRIDAY! Love and a toothy smile. – Ash


Thriving Thursday: Zucchini Boats

Grains and sugars before bed are bad. Grains hit your tongue and turn into sugar. Sugar is digested and stored in your body until you use it. If you don’t it turns into fat. In that vain, I’ve been trying to cut pasta and other grains out of our dinner plates and limit the amount of dessert I have. How do you make a delicious dinner with a base of vegetables rather than pasta??

Most of the recipes I have posted fulfill this requirement but Zucchini Boats are some of my favorite. (check out the panel at the top of this page for “recipes”) Zucchini Boats are fun to make, really tasty, and the name is just awesome. I adapted this recipe from my Maximized Living Nutrition Plan book.

photo 1

Zucchini Boats (2-4 servings, I doubled it for the next night)

Ingredients (As many organic as possible! Especially the meat)

  • 2 medium zucchini
  • 3/4 lb ground turkey
  • 1 small onion, chopped
  • 2 Tbsp tomato paste
  • 1 red bell pepper, chopped
  • 5 baby bella mushrooms, chopped
  • 1/2 tsp sea salt
  • 1/4 tsp pepper

Instructions

  1. Heat oven to 350°F. Butter or line a baking pan with parchment paper and set it aside.
  2. Trim the ends of the zucchini then cut them in half lengthwise.
  3. Scoop out pulp, leaving a 1/2″ thick shell. Chop the pulp.
  4. Over medium-high heat, cook zucchini pulp, ground turkey, onion, mushroom, and peppers. For about 10 minutes, until meat is brown. Drain the juice.
  5. Remove from heat and add the remaining ingredients. Mix well.
  6. If you’re saving some for tomorrow, seal up half the boats in a glass container (or plastic if you must)
  7. Place the remaining shells in the baking pan. Spoon the mix into all the zucchini shells.
  8. Bake the boats for 20 minutes.
  9. Enjoy!


Just-Try-It Thursday: Frittata

This recipe is really flippin’ easy. And cheap! (I got it from an awesome blog I read regularly: Once A Month) I cooked it immediately after my workout and was eating within 20 minutes. It is a pretty basic dish though so I also had a couple of pieces of toast. One with almond butter, one with honey. It would be delicious with roasted potatoes though.

Veggie Frittata (serves 4)

Ingredients

8 eggs – keep the yolks! They’re a healthy fat.

Whatever veggies you have – I used green peppers, mushrooms, garlic, tomatoes, and a bit of spinach. Onions would be really good too.

1/2 cup almond, coconut, or full fat milk

salt and peppa

1. Chop up all the veggie and sauté the hard veggies (peppers, mushrooms, garlic, onions) in a Tbsp of oil. Medium heat for 5 minutes.

2. While they’re cooking, scramble the eggs and milk together. Use a big bowl and a whisk. Don’t stop until the eggs get frothy.

3. Add the soft veggies (tomatoes) to your sauté and spread everything out evenly.

4. Pour on the eggs. And top with any green leaves you have. Cook on medium heat for 5 minutes. Then transfer to the oven to broil for another 5 minutes.

5. Take it out and cut into it! I kept mine covered for a few minutes before eating it and it went from pretty and fluffy to sadly deflated. But it was still delicious!

Let me know how it goes! (< do this by clicking the title of this blog post and entering your message under “penny for your thoughts)

Sunday Seriously Fun Day!

Whew! What a weekend! Mike and I just finished unpacking from an action filled, awesomely adventurous weekend in Chicago. We did a little bit more of celebrating my birthday and a lot more of exploring Illinois. I can officially say that, as an architecture nerd (aka Archie), foodie, and culture lover, I LOVE Chicago. It’s like a perfect cross between Boston (my most favorite city) and NYC (my least favorite). So many gorgeous parks and mindblowing architecture. I just love it.

Because of the fact that I workout and eat right pretty much every day of the week, when I go on vacation, I’m on vacation. I learned this from my Momma and it works out pretty well. You get to enjoy the leisure of sleeping in and eating whatever strikes your fancy for a few days AND it’s a fantastic reminder of why I live the way I do. I now feel like a donkey’s rear end. An ass’s ass you might say. I am incredibly lethargic, having stomach cramps and bloating, and sore everywhere from a lack of stretching and muscle strengthening.

On that note, here is a photo montage of our weekend in the Windy City.

Question: For those of you following via email, can you see these photos in your message?

^ View of the skyline from the ferris wheel on Navy Pier.

^ Had to hit up Trader Joe’s to stock up on the cheap almond butter and other treats.

^ Mike and I at the Bean (aka Cloud Gate) in Millenium Park. Definitely my favorite area of the city.

^ We went to the Grand Lux Cafe for my birthday lunch. SO GOOD. Thanks Mom and Dad!

^Let’s start with a pineapple basil mojito and fresh calamari with zucchini and onion.

^ Kobe Meatballs with Cheesy Polenta.

^ Happy Belated Birthday to me!

^ Lava cake. When I broke it open the chocolate sauce poured out. I almost hyperventilated with glee.

^ Aw. He’s my best friend and my love. 🙂

^ Gorgeous drive home. Go sustainable energy!!

It was a fantastic weekend with my wonderful boyfriend. Thanks to my Mom and Dad for giving us a chance to live like we have money. I’m such a happy camper.

Maybe my smiles tonight will radiate all over the world and rub off on you guys 🙂

Thursday Recipe: Build-a-Salad


*to those interested, birthday update at the bottom of the page

Whenever I mention healthy eating, people’s automatic reaction is, “I hate salad.” Let me share something, me too. The typical restaurant salad is cold, unsavory, and wholly unsatisfying. But I’ve recently determined that they’re doing it wrong. As I’ve mentioned before, my current lifestyle goal is only eating grain for lunch and restricting carbs at dinner. This is not to lose weight but to prevent a haphazard insulin spike right before bed. So “salads” have become my go to dinner options and I’ve realized, they’re not all that bad!

To build a great salad just replace whatever carb you were going to use (pasta, rice, potatoes, etc) with dark leafy greens (I prefer spinach). This means that you get the healthy without sacrificing the hot and savory.

Recently, in the vain of cooking a big portion of one thing, I made cooked a big batch of lentils and steamed some extra veggies I had lying in my fridge. Here is the result:

^ Start with the leafy green base. Don’t worry, it will be covered up soon.

^ Add whatever warm veggies you decided to cook. I have zucchini, red bell peppers, and eggplant.

^ Pile on whatever protein you want. I made lentils but you could do any kind of meat or legume.

^ Top it off with a healthy fat like goat or sheep cheese (pretty much lactose free) and some oil based dressing like balsamic or italian. And enjoy!

* Final note: My birthday ended up being quite wonderful. My coworkers remembered and even gave me gifts. I got so much love through this blog and facebook and texting and phone calls. AND Mike came home from his business trip early! He surprised me at work with flowers, a bottle of wine, and a Gap coat that I’ve been eyeing for months. What wonderful people I have in my life. Thanks everyone 🙂

Today, just smile.


Recipe: Big Ole Pot O’ [healthy] Chili

Sorry for the late post today. I was cooking all day and wanted to post a recipe of something cool. And I made chili!

I mistakenly bought dry pinto beans instead of canned ones so that added an extra 5 hours onto the hour and a half taken to actually prepare the chili. BUY CANNED PINTO BEANS.

This recipe is from my favorite nutrition book, check it out here. It’s a scientific breakdown of your body and the nutrients it needs and doesn’t get in the modern american diet. Anyway, here’s the recipe. It’s really simple and takes a tiny bit of prep time and some serious simmer time. But it’s SOOOO delicious and SOOOOO healthy.

Prepping dried pinto beans (if you don’t want to spend the time just buy canned ones):

^ Sort the beans to pick out any rocks or cracked beans, then rinse them.


^ Fill pot with water 3″ above the beans. Boil then cover and simmer for 1 hour. Drain them.

Fill pot with water 1″ above the beans. Boil then cover and simmer for 4 hours. Check every hour to make sure there is still water.

Drain and they’re finally ready!

Ingredients (serves 8-10 < but they’ll want more than one serving):

2 Tbsp coconut oil

1 cup chopped onion

1 cup chopped celery

4 cloves minced garlic

2 cups chopped green pepper

4 cups pinto, black, or kidney beans

4 tsp oregano

4 tsp chili powder

4 tsp ground cumin

2 tsp sea salt

2 8 ounce cans crushed tomatoes (get organic if you can!)

1.5 to 3 pounds of organic ground chicken or turkey or grass-fed ground beef

Instructions:

Heat oil in large pot and saute onions, celery, garlic, and peppers until onion is translucent, 3-4 minutes. Add meat, chili powder, and cumin, continue cooking, stirring frequently, for 5-6 minutes. Pour salt and tomatoes into pot. Cover and reduce heat to simmer for at least one hour. I finished cooking earlier than I expected so I just kept the simmer going and it got even more delicious.

^ nom nom nom.

If you try it, let me know how it goes!


Roasted Chicken and Some Other Deliciousness

Gooooood Morning!

I have to say that I’ve been so excited to get back into a routine and now that I’m finally getting there, all I miss is sleeping in! I just have to make up for it with weekend napping.

Anyhooo. Last night I ran to the grocery store after work and decided to roast a whole chicken. I got this recipe from a good friend of mine. I cooked her dinner one night and we got to talking and trading recipes. This one has withstood the test of an amateur cook (me!).

The organic chicken I bought was $12 for 3 lb at our local Kroger’s (it’s like Stop and Shop or Vons). It’s rather expensive but so worth it for the lack of toxins, mistreatment, and better taste! And roasting a whole chicken is really cost-effective. The 3lb I bought will last us at least three days with chicken for one meal a day.

NOTE: the recipe seems long but it’s SO easy and has very basic, very flexible ingredients.

Ingredients for the chicken:

one whole, organic chicken (if frozen, let thaw for 24 hours)

few sprigs of rosemary, chopped into 2 inch pieces

half a lemon

1 tbsp sea salt and 1 tsp ground pepper

1/4 cup olive oil

1/4 garlic bulb

Additional, optional ingredients:

sweet potatoes

normal potatoes

butternut squash

broccoli

onion

bell pepper

Prep the Chicken:

Preheat the oven to 450°F. Remove the innards if they came with the chicken (this is the grossest part). Place chicken on a baking pan. Cut 4 or 5 tears in chicken skin and stuff some chopped rosemary and a garlic clove in each one. In a small glass mix sea salt and pepper, olive oil, juice from lemon (save the skin), and rest of the garlic. Use your hands to rub the scrub mixture into the chicken. Flip it over to get the underside as well. Stuff the bum of the chicken with the used lemon skins and more rosemary.

Add the fun stuff: 

I also bought a butternut squash and some potatoes and had some leftover onions in the fridge. I’d never cooked with squash so I was kind of nervous but I just went for it. Cut your add ons into bite sized pieces and scatter them around the edges of the chicken. No need to season, everything you just put on the chicken will make it SO delicious.

^ The chicken and add ons before roasting. Don’t put it on wax paper, it ended up sticking.

To Roast:

Scroll down to find “Roasting Temperatures and Times”: http://www.helpwithcooking.com/cooking-poultry/roast-chicken.html < I definitely keep the temp at 450° for the first 10 minutes then lower it for the rest of the cooking time. You can pretty much leave it alone after that.

I regret to inform you that I was so excited about the chicken that I didn’t take a picture before carving it. But here it is all plated with cabbage salad (not so yummy)! Mike and I both agreed that it was delicious. And the squash turned out better than I could have imagined.

^Bon a petit! *from now on pictures will be taken on a real camera instead of my iPhone. no more blurriness.