Tag Archives: life

Thriving Thursday: Grocery Shopping Guide

In talking to people all over my community, I’ve discovered that very few of them know how to grocery shop. We have SO many options. When you’re trying to get healthy, what’s the right brand of healthy to buy? This is a simple beginner’s guide to healthy grocery shopping.

So here is a set of rules to help you navigate more quickly through the maze of choices.

photo 10

1. Always start with the whole foods. Start in the produce section and let yourself salivate over the deep orange bell peppers or in-season strawberries. If your store has them, move on to the bulk seeds and nuts. Then peruse the other sections, skipping processed foods whenever possible.  Focus your efforts where you can find the most nutrients: in whole foods!

SalsaNutritionPanel

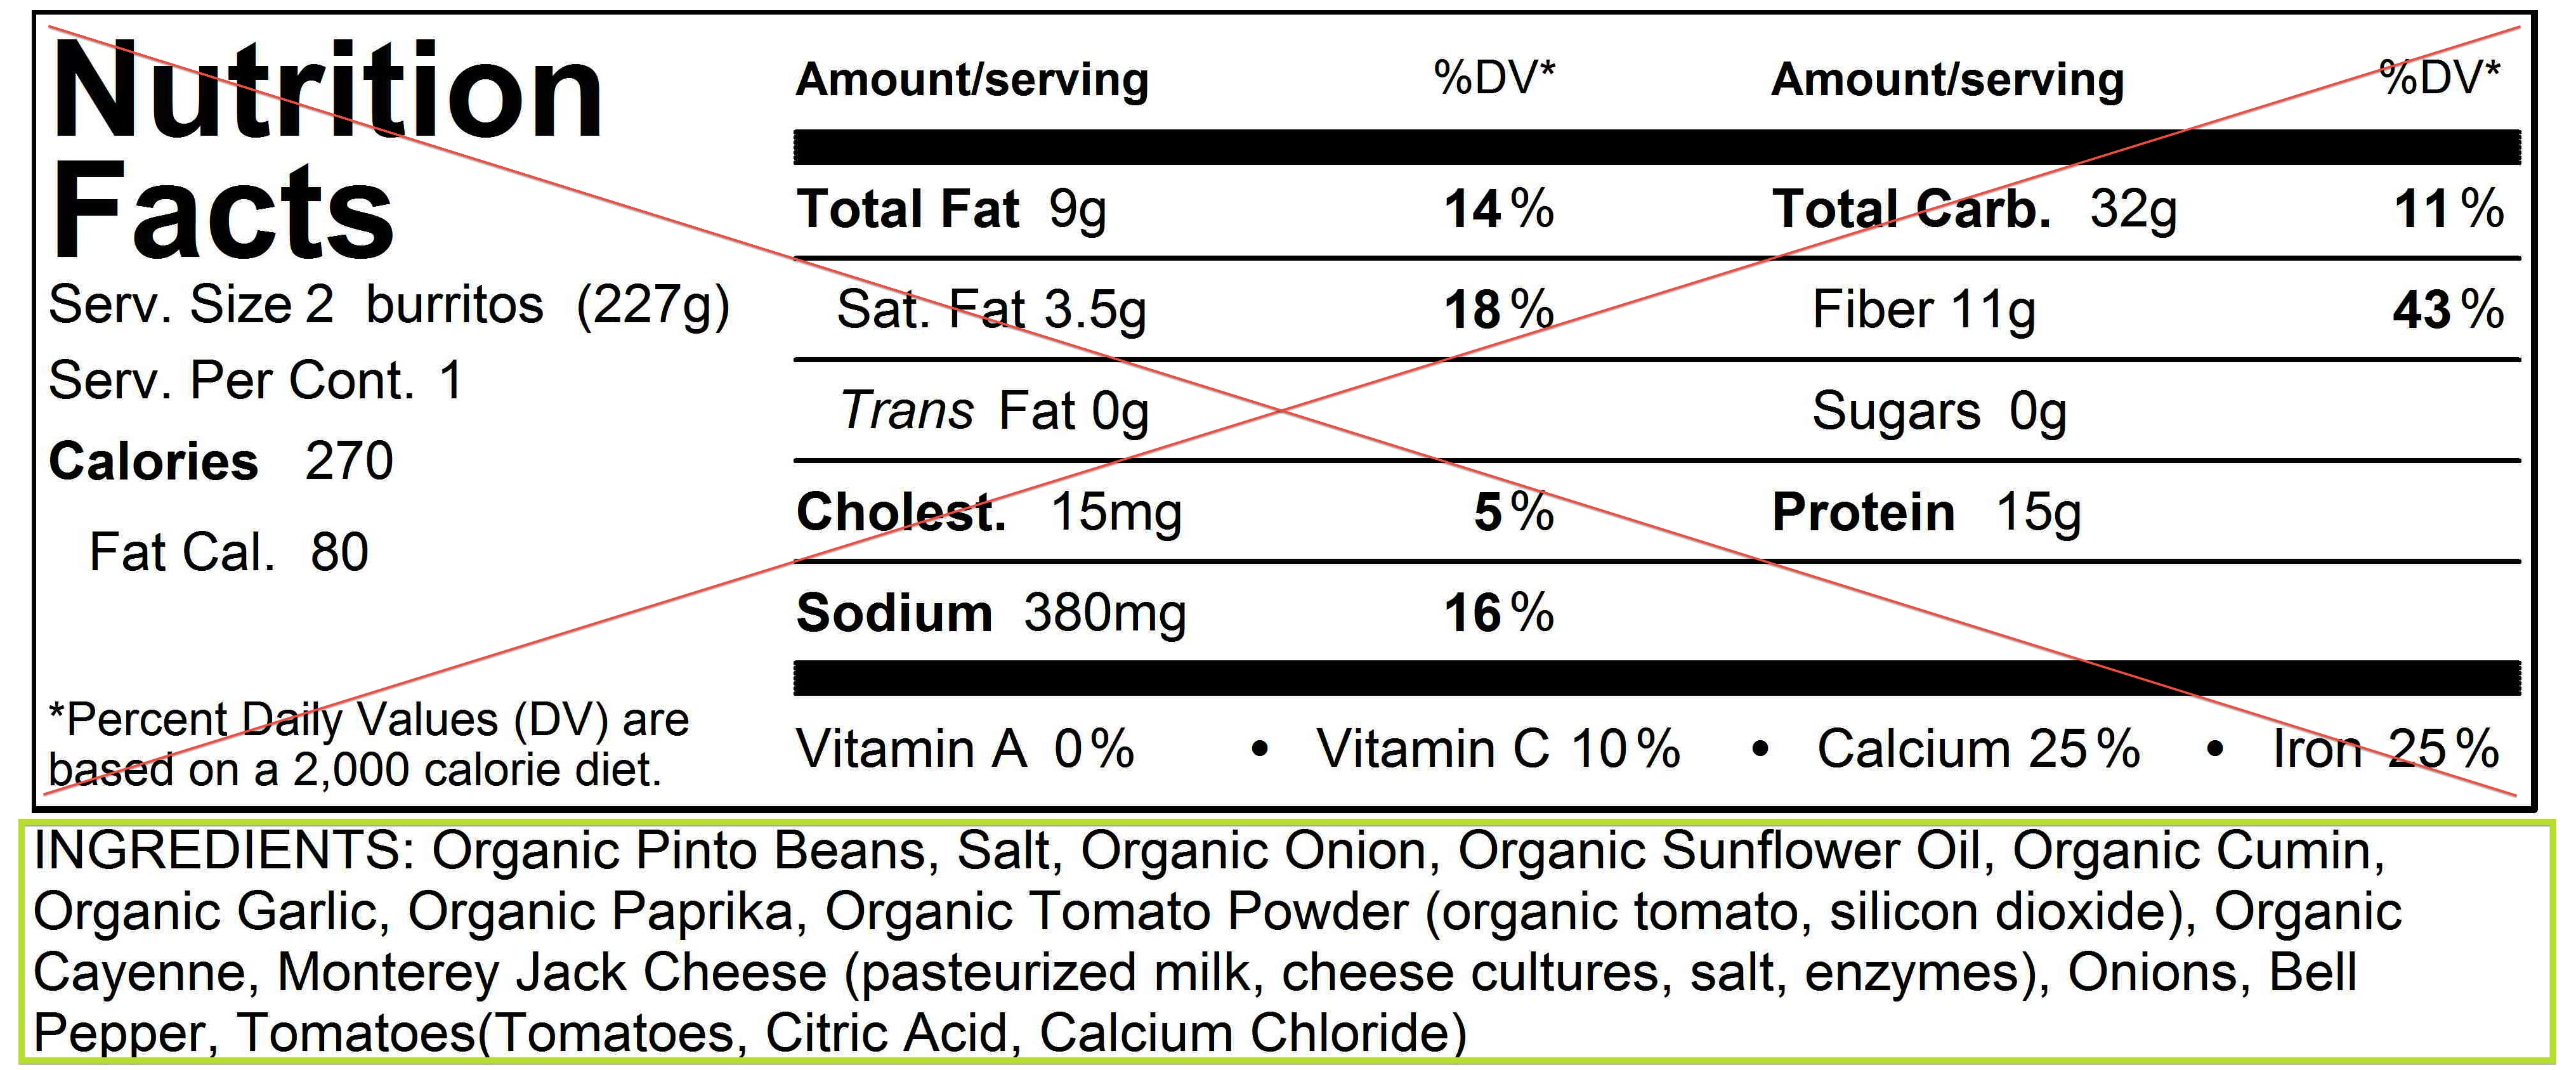
2. Check the INGREDIENTS not the nutrition panel. Only buy processed food that you can’t find in a whole food form. We have been trained to look at the nutrition panel on all packaged foods. How many calories, how much fat, and sodium, etc. But new research and my personal observation shows that it’s the ingredients that matter, not the nutritional breakdown. The fewer ingredients the better and make sure you can recognize the name of everything in the processed food you’re eating.

photo 7

3. Avoid sugar like the plague. When you start looking at ingredients in processed food, you’ll notice that sugar is added to EVERYTHING. Check out this post for why sugar is bad. Aside from the obvious “sugar,” Anything ending in “-ose” is sugar including sucrose, fructose, and glucose. Any “gum” is considered sugar including lecithin gum and xanthan gum. And any kind of “syrup” is sugar including brown rice sugar. And finally, ASPARTAME IS EVIL. It’s a neurotoxin. Check the post mentioned above for more info.

photo 2

4. NEVER buy “low-fat” or “reduced fat” or “1%” fat or any product from which they’ve removed the fat. This includes milk. Buy whole milk! when manufacturers remove the fat, the concentration of sugar in the substance is even higher. They even add sugar sometimes (!) because the product tastes so bad without its natural fat. Seriously. So it has higher sugar content but a lot of those fats are actually very good for you. They are necessary for your bodies proper function. So just keep the fat in!

There are only a few guiding principles to the beginner’s healthy shopping but man they are whoppers. Budget double the time it normally takes you to shop, at least until you can find the brands you like. Once you’re adjusted you’ll zoom through the grocery store once again!

I hope you’re all having fantabulous days. Love and a big smile 🙂 – Ash

Workout Wednesday: Perceived Threshold

People ask me every Tuesday night whether I’m going to take it easy on them or kill them with this workout. My reply is always that I’ll make you feel like you’re dying but you’ll feel amazing afterward. And it’s true!

With these types of workouts, you should be going at such an effort that your muscles stop working, your lungs are burning, and you feel an achy pain in muscles you didn’t even know you had. As long as you are not feeling sharp pain anywhere, and are focusing on correct form, you are doing it right. (If you start to experience sharp pain of any kind, especially in joints, stop that exercise immediately and consult a doc about it.)

So keep going, hard. Work through the pain. The thing that separates you and a higher level of fitness is the ability to push past your perceived threshold. You can always go faster, jump higher, and lunge lower. No excuses!

And now … the workout!

Beginner through intermediate (12 minutes)

– 20 seconds on/ 20 seconds off

– each exercise 3 times in a row

Advanced (16 minutes)

– 30 seconds on/ 10 seconds off

– each exercise 4 times in a row

Exercises:

High Knees

1. high knees (hold your hands at a certain height and bring your knees to touch them)

TriDip

2. tri dips (legs bent in or held straight out)

calfjump

3. calf jumps (too easy? jump higher, jump faster, hold weights in your hands)

crunches

4. crunches (focus on lifting your shoulders, DO NOT pull on your neck; beginner-feet on ground, intermediate-feet at right angle, advanced-feet in air)

plank(better)

5. plank tick tock (beginner-knees or elbows on ground, intermediate-full plank, advanced-lift one leg and, keeping it straight, swing it out to the side, then bring it back to center and do the same with the other leg, in a pendulum-like motion)

Lunge

6. speed lunges (keep feet planted and bounce upper body up and down, switch legs at half-way point)

+ Fit Minute. Choose one of the following exercises. Do it for a full minute at 100% effort. Count how many you do and record it. We’ll be doing these after every workout from now on:

  • Level 1 – side to side steps or jumping jacks
  • Level 2 – push ups
  • Level 3 – burpees

I hope you get all charged up after these workouts like I do. Love and a big smile 🙂 – Ash

Tasty Tuesday: Banana Nut Bread

This bread is delicious. Really, really good. It’s moist and naturally sweet; and the texture is like butter in your mouth. Yummy. It can take up to 45 minutes to prepare and an hour to cook so do it on a Sunday and make a big batch. It freezes really well so leftovers are a good thing!

I found the recipe on another blog (Skinny Ms) and then tweaked it a bit. I took out the stevia and oat bran and added gluten-free oats and walnuts.

Because it’s high in protein, sugar-free, and very low in grains, you can eat it any time of day. We had it last night for dessert and this morning for breakfast. Toast it for a few minutes for an even more satisfying experience.

photo

Banana Nut Bread

Ingredients

  • 2 granny smith apples
  • 3 very ripe bananas
  • 8 Tbsp. olive oil
  • 2 eggs
  • 1/4 cup almond milk
  • 1 cup almond meal/ almond flour
  • 1 cup whole, gluten-free oats
  • 1 tsp. baking powder
  • 1 tsp. cinnamon
  • 1/4 tsp. nutmeg
  • 1/2 tsp. vanilla extract

Instructions

  1. Preheat oven to 180°F. Lightly coat loaf pan with 1/2 Tbsp. olive oil.
  2. Peel, core, and dice apples into small pieces. Sauté with 1/2 tsp. cinnamon on medium heat until brown (about 5 minutes).
  3. In a large bowl mix together the almond meal, oats, baking powder, remaining cinnamon, and nutmeg. Set aside.
  4. In another bowl mix olive oil, eggs, almond milk, and vanilla.
  5. Slowly add the liquid mixture to the dry mixture (in about 4 batches).
  6. In the now empty liquid mixture bowl, mash all 3 bananas.
  7. Fold bananas and apples into the large bowl mixture.
  8. Spoon into the loaf pan. Cook for about 50 minutes or until a wooden skewer or toothpick comes out clean.
  9. Let cool in pan and then enjoy!

I highly recommend this one. It really is delicious. Let me know how it goes! A big hug and a smile. – Ash


Mindful Monday: Online Dating

I’m in a relationship. A fantastic one that brings me happiness every single day. But I was one of the lucky ones who found a partner in college. What if you’re not that lucky?

Mike and I talk a lot about how different it must be to be in a relationship in 2013 than it was in 1980. There are more opportunities to meet people from far away, communication is made so much easier through technology, and there are less barriers for women to be successful.

But when it all comes down to it, a relationship only works in the long run if you live in the same city, share common interests, and are a shooting for common goals. No matter what year it is, that’s a tough set of requirements.

That problem poses the technological solution: online dating. The stigma around it is slowly disintegrating. It’s now common place for singles of all life situations, from young professionals to older retirees, to join the many programs out there. Anyway! A blog I regularly read (Once a Month for Ladies) just posted the story of one such program. It’s a short but interesting read and reflects the harrows and successes of completely blind dates.

Grouper: The date. Not the fish.

– Once a Month for Ladies

I hope you’re all having awesome days. Love and a sweet smile. – Ash

Friday Design: Spring in My Dining Room

It’s Spring in my dining room! As most of you know, I’m an architect by training. So when we moved into our apartment here, I was SO excited to actually have some space to decorate. I absolutely love bold colors so I was pretty bummed when I realized that we couldn’t paint the walls. Instead, I’ve learned to inject color into a room through wall art, dish ware, rugs, etc.

I found a deal at our local grocery on a dozen roses ($5!) and used them to bring Spring into our home. It’s still pretty cold here but the sun in shining and it’s putting me (and everyone else) in a great mood. Not to mention my Happiness Project is actually working 🙂

photo 2^ Pretty flowers in my new vase …

And, if you’ve checked out my tagline (“braving the world with no money in my pocket and a smile on my face”) you know that we can’t put much money into making our apartment beautiful. So here’s the breakdown:

  • Gorgeous Fire/Water painting – moving gift from a very close friend. You could probably do a simple, impactful painting for about $50. As a word of advice, shower praise on the artists in your life. There’s nothing better than a gorgeous piece of art that actually means something.
  • Table set with cool, high-back chairs (I plan on refinishing this) – Craigslist $80
  • Striped rug – TJMaxx $65
  • Plant – bought it as a seedling – Loews $10
  • Recycled tire pot – Unclaimed Freight Store (check for one in your area) $10
  • Yellow vase – Unclaimed Freight $3
  • Green and blue swirl fruit bowl – hand painted by me! $25 (but worth the experience)

photo 1Everything in this photo= $188

And now we’re at the weekend. YAY. Au revoir until Monday! I hope you all have a relaxing couple of days. Love and hugs – Ash


Thriving Thursday: Mom’s Shepherds Pie

Happy Thursday to you all! It’s almost the weekend and I’m excited about it. This last couple months has been absolutely crazy at work. It’s really wonderful to see so many people starting their path to health but I’m a little glad that it’s starting to taper now. I was starting to miss my relaxation (and cooking) time. So here is a great recipe directly from my Momma’s kitchen.

My mom is a fabulous cook. She claims to hate it but how can you hate something you’re so good at?? I think she gets tired of cooking every single night (who wouldn’t) but goodness knows we would have been a MUCH less healthy family without her daily meals.

She is one of those people who can whip up a meal when the fridge and pantry are completely empty. If friends stop by for a chat, she has the most creative and delicious appetizers on the table within 5 minutes. She has mastered the art of feeding AND socializing with people. Those who have tried it know how hard that can be.

She taught me this recipe before I left for college and it quickly became my signature dish. She uses mashed potatoes from the box (understandable with 4 kids and no time) but I love mashing potatoes. They taste better and I get to let out my pent-up aggression on them. So I turned to my friend Alex for some further input. She is also an amazing chef and trained in the art of food.

So here is my combination from the two lovely ladies. My mom’s was quicker but slightly healthier and Alex’s was a little more time-consuming but richer and more savory.

ShepherdsPie-Published

Mom’s Shepherds Pie

Note: This is a delicious dish but if you’re trying to lose weight, do not eat it for dinner. You don’t want the potatoes sitting in your stomach all night. Unless you use the energy, it will turn into fat.

Ingredients:

  • 5 medium potatoes
  • 1 cup organic butter
  • 1 cup milk (unsweetened almond, coconut, whatever…)
  • 1.5 lbs ground turkey
  • 2 Tbsp high heat oil (like coconut or grape seed)
  • 1 onion
  • 3 carrots
  • 1 zucchini
  • 4 cloves garlic
  • 1 cup gravy (I use Bisto but it contains trace gluten so be careful)
  • salt and pepper

Instructions:

  1. Preheat the oven to its lowest setting.
  2. Chop potatoes into small pieces. Boil them in a large pot of water until soft when stabbed with a fork.
  3. While they’re boiling, chop the onion, carrots, and zucchini.
  4. Drain the potatoes and mix in a large bowl with butter and milk. Mash them all up! Set aside.
  5. In a large pot (yes a large pot) sauté the onions, carrots, and minced garlic on medium heat. Cook until onion is transparent, about 5 minutes.
  6. Add turkey and zucchini to the skillet. Cook for 5 minutes then add gravy. Continue to cook until meat is browned.
  7. Spread out the turkey mixture evenly in the pot then layer the potatoes on top.
  8. Heat in the oven for 5 minutes to let juices mix.
  9. Enjoy!

I hope you’re all having wonderful days. Love and a grin. – Ash


Workout Wednesday: Remeasure Time!

This workout capped off an 8-week weight loss challenge for a lot of my patients. At 4 weeks they were doing really well. The goal is to lose 10 pounds and most of them had done it. Then, as the weeks rolled along, they forgot about the changes they had made and a lot of them returned to their previous weight.

There were two people who kept weight off, but I know they slacked towards the end too. The interesting thing is that they all come to me with tips to get back on the healthy track but they already know how! If you’ve done it once before, you can do it again. Humans don’t really learn permanent lessons from doing something for a month. So if and when you fall off the wagon, jump back on! You know how to get back to health. And maybe this time you can make it stick. It’s all up to you.

Anyway, I love my health and the body it has given me. I’m right where I want to be, which I why I love helping people get to that state of mind as well. But I figured I’d participate just to see if there was any change. I measured the largest width from my arm, leg, and belly. My measurements 8 weeks ago and today are:

  • Right arm 8 weeks ago- 12″, today- 11.5″
  • Right leg 8 weeks ago- 24.5″, today- 24.5″
  • Stomach 8 weeks ago-  32.5″, today- 33″

HA! So pretty much exactly the same. I’m happy with that 🙂 And finally the workout you’ve been looking for.

Beginner through intermediate (12 minutes)

– 20 seconds on/ 20 seconds off

– each exercise 3 times in a row

Advanced (16 minutes)

– 30 seconds on/ 10 seconds off

– each exercise 4 times in a row

Exercises:

LowJacks2LowJacks1

1) low jacks (keep your upper body level)

PushUp

2) push ups (beginner- on your knees OR on your feet standing and pushing against a wall)

Squat

3) speed squats (lower ab brace is very important here)

Situps

4) sit ups (lift your shoulders first, DO NOT wrench your neck)

Lunge

5) lunges (shoulders over hips, knee over ankle)

burpees

6) 1/2 burpee (without the push up, step 4)

I hope you’re all having awesome days! Love and a big fat smile. – Ash


The Healthful, Happy, and Loving Project …

BullEye

March Goals:

  • Take a 5-minute walk down the block, every morning between shower and work. SLOWLY.
  • When I’m sad, stop thinking of the future. Just smile and try to make that moment happier.
  • Chose a day of the week to talk to each parent and sibling. Like I do with Gran.
  • Read this list every day.
  • Remember to be happy when I succeed.

These seem like some pretty specific goals right? How did I arrive at them? Well …

HappinessProject

There’s a really awesome book a friend sent me. It’s called The Happiness Project by Gretchen Rubin. Instead of being all preachy and general, she chronicles the details of finding her way to happiness. She lays out a list of what she wants to improve and then divides that list into manageable parts. It’s basically a book about baby steps.

I’m finding it very inspirational so I’ve decided to do the same. Every month I’ll lay out my goals for you all to see. I’m not doing this because I’m particularly unhappy. I just have so much awesomeness in my life and I think I could appreciate it better. If I’m not 100% content when everything is hunky-dory, what will happen when life isn’t so nice? I want my happiness to be strong enough to withstand even the hardest challenges.

The questions I’m asking myself:

  • What makes me feel good?
  • What makes me feel bad?
  • Is there any way in which I don’t feel right about my life?
  • Do I live in a way that encourages growth?

My answers to solve these questions – 2013 Goals:

  • Stop being so concerned with the future (haha, does the list of goals act against that?).
  • Learn to switch off work and relax.
  • Be outdoors more.
  • Wake up more energized.
  • Pay off my credit card bills.
  • Invest in quality cooking and cleaning tools – then use them to their full potential.
  • Communicate more regularly with friends and family.
  • Improve our nutrition (eat more raw, nutrient-dense food and cut out all dinnertime grains and sugars).
  • Remove toxins from our food, personal hygiene, cleaning products, etc.
  • Learn to enjoy riding my bike again.
  • Stop putting so much pressure on myself.
  • Remember to be happy when I succeed at these goals.

Things I don’t want to change:

  • My commitment to exercise.
  • My love of healthy cooking.
  • The strength of Mike and My relationship.
  • The strength of my ties to my family.
  • My plans for travel.
  • My thankful heart.
  • My cleanliness and organization.

Happy

My Commandments:

  • Just because it’s fun for someone else, doesn’t mean it’s fun for me.
  • Me is the perfect person for me to be.
  • It’s NOT “doing nothing,” it IS “active relaxation.”
  • Life is play, not an endless stream of work.
  • A true smile and laugh can change a whole conversation.
  • Want what I already have.
  • I don’t have to be good at everything.

To that end, I will let you know, each month what my focus goals are for that month. I’ll pick as many or as few as I think I can handle. Some of them may be focused on for multiple months, some may be much easier than that. Since March is 1/3 of the way in, this month’s list is relatively short. But there’s no better time to start than today!

Does anyone want to join me in this? It can be as big or small of a project as you like. Let me know!

Love and a big smile. – Ash


Mindful Monday: Never Enough

This morning’s repost is from a very smart man. His name is Seth Godin. He wrote an awesome book on entrepreneurship in today’s world (The Purple Cow). The type of world where ads on TV and small, incremental product improvements are not enough. Where business starters have to have not only a unique idea but myriad ways to get people to actually buy it. It’s a great book. A quick read full of awesome information, I recommend it.


He also writes a blog. Short posts dense with recommendations for leading a successful life. I thought his post today was perfect. Especially for a Monday morning. Just read it:

SethGodin

Never Enough

-Seth Godin

“There’s never enough time to be as patient as we need to be … investing now, when it’s difficult, is the single best moment.”

So don’t save for tomorrow what you know you need to do today. Even if it was extra hard to wake up this morning. Happy Monday everyone! Love and a toothy smile. – Ash


DIY Friday: Meal Planning Board

So you’re trying to eat healthy? I bet you have tons of people in the wellness community telling you “it’s really not that expensive!” Well they are wrong. Eating healthy can be VERY expensive. To keep the cost manageable you have to do a lot of planning. You have you cook most of your own food and you can’t have any food waste. Unless you plan, IT IS time-consuming and expensive.

Mike and I have been gradually increasing our health factor over the last several months while trying to keep costs low. We have set up a system where, whenever either of us buys food, we put the receipt on the coffee table for the other to review. It holds us accountable and makes us analyze where money could be better spent.

Then I meal plan. I’m very organized and love to plan ahead so this isn’t too hard for me but I was lacking the necessary tools. That’s why I made this bad boy. My meal planning board.

photo 1 copy


My dinner system:

  • Cook double-portions every other day. This means only cooking from scratch 3 times a week! I cook half the meal only partially so it’s not overcooked when I reheat it for dinner the next day.
  • Eat leftovers on the days I don’t cook.
  • Have our “vacation meal” on the seventh day.

It’s quick and means that I can buy more in bulk. Our breakfast is the same every morning (Grainless Granola) and each of us takes care of our lunch separately. It’s a pretty nifty system but I was getting really confused about which meals I was going to cook and which food I needed on my weekly grocery shop.

So during our Simple Sunday this past weekend, the weather was nice enough to paint out on the porch. I finally did my Meal Planning board and I love it!

Supplies:

  • Pretty frame (mine was $5 at Goodwill)
  • Spray paint (for color)
  • Spray paint (for chalk or whiteboard coating)
  • clothespins
  • some cardstock to label the pins
  • fabric to hold the labels
  • hot glue gun
  • a little sandpaper to prep the frame glass
  • painters tape (if you want to do a pattern)
  • an old sheet to protect your floor

Instructions:

photo 2^ Make sure you have a surface to stick the pins to. This frame had lots of dips in it so I blocked it out with some chips of cardboard I had in the recycling bin.

photo 3^ Separate the frame and glass. Sand the glass so it will hold the paint. Spray down all pieces with however many coats they need. *I started with chalkboard paint but it didn’t work all that well. I went back and exchanged it for whiteboard paint and repainted the glass.

photo 4< If you want to paint a pattern, wait until the base layer is dry and then tape it off and spray. *I originally had yellow stripes in mine but it was just too much with the raised dots AND baby yellow. After I finished it I went back and repainted it all white.

Stick the clothespins down with hot glue. If that doesn’t hold, graduate to the messier but much stronger Gorilla Glue.

photo 2 copy^ Cut out your cardstock. And write out any of your favorite dishes. Hot glue your fabric pockets to store them in. Then label the pins with the same cardstock. Mine are for each day of the week and then Snacks to take to work for that week. Here’s the template I made for my labels:  MealBoardLabels

Another idea, for complicated meals, write the ingredients on the back of the card so you don’t have to look back to the cook book every time.

photo 1 copy

And now you have a meal planning board! I’ve only been using mine for a week and I already love it. It takes the strain out of meal planning and makes cooking SO much easier. I will say it looks a little sad and bland with all the white and gray but I’m hoping I can paint the walls our next kitchen so it will just be a pretty accent on a sunny yellow wall. 🙂

Let me know if you have any questions. And HAPPY FRIDAY! Love and a toothy smile. – Ash