Category Archives: Nutrition

Tasty Tuesday: Chocolate Fudge Frosting

Side note: I will have a recipe today, so as not to satisfy a terrorists hunger to be the center of attention. But, please see the bottom of this post for my thoughts…

And now, on to the frosting! Mike is out of town for a couple of weeks 😦 so I have been ultra productive in his absence. It’s amazing how a lack of company will get me motivated. So I made a chocolate fudge cake and had no idea what to use as frosting. The packaged stuff is so full of sugar that it makes me nauseas. So I made my own! And holy bajolies it is delicious.

When warm, it’s melt on your tongue chocolatey goodness. When cold, it hardens into pure chocolate bliss on top of your cake. Also, because I use coconut sugar, it doesn’t spike your blood sugar. Sweet!

ChocolateFrosting-published Continue reading

Tasty Tuesday: Sweet Potato Home Fries

Happy Tuesday! In an effort to cut back on our grocery bill, I’m only buying produce for the entire month of April. It seems that it’s really the organic, natural packaged crap that’s expensive, so we’re doing a lot of fruit and veg this month. In that vain, I had no idea what to pair with the salmon I cooked the other night, so I made it up … sweet potato home fries! These babies keep great in the fridge. They’re delicious warm and really yummy cold too.

SweetPotatoHomeFries-Published

Sweet Potato Home Fries (serves: 4, cook time: 30 minutes)

Ingredients:

  • 2 large sweet potatoes
  • 1 cup mushrooms
  • 1 onion
  • 3 cloves garlic
  • 1/4 cup high heat oil
  • sea salt and ground pepper

Instructions:

  1. Chop the potatoes, mushrooms, and onion into bite-sized chunks. Mince the garlic on top of the potatoes.
  2. Heat the skillet to medium first, THEN add half the oil. Coat the bottom of your skillet.
  3. Add sweet potatoes, garlic, and onions and spread in an even layer in the skillet. Cook on medium-high heat, uncovered until potatoes are browned and onions are caramelized, about 10 minutes. Add the rest of the oil, slowly, as needed. Take care not to mess with them too much, flip potatoes once or twice in the entire 10-ish minutes.
  4. When your mix is pretty well cooked, add the mushrooms. These are already soft so they don’t take much cooking. Cook for a few more minutes to heat up the mushrooms.
  5. Sprinkle with salt and pepper. Serve and enjoy!

photo 3photo 1

Ashley Life Update: I had a wonderful weekend at a friend’s wedding in Louisiana. Got to hang out with my immediate family (see my sister’s and I above) and a lot of friends I haven’t seen in a long time. And the 13 hour drive there and back wasn’t too bad. We set up a bed in the back of the car and then whoever was driving listened to books on tape. Man those things pass the time!

We also stopped at an epic Country Buffet in Arkansas (the best in the state). I swear I had no idea that America had areas like that. Just VERY southern. That’s why I love road trips, you see cultures you never would have explored otherwise.

AND, another plus, we finally got some communication from Mike’s job. We should be finding out our next stop in the next couple weeks and the options are looking good!

I hope you all had great weekends too! Love and hugs – Ash


Tasty Tuesday: Sweet and Salty Popcorn

What do you cook when the entire meal will be appetizers? I knew that most people wouldn’t be hungry for a full meal so I planned out four appetizers instead. They all worked perfectly, except for this one. This took two tries but it was SO worth it. I got the original recipe from Sammie Kennedy. This stuff melts in your mouth. It’s gooey and chewy and crunchy. Salty AND sweet. YUM

I still had the microwave at this point but I was trying to wean myself off it. Turns out popping popcorn on the stove can be kind of tricky. This is where the first attempt failed. When I tried again the next day I was significantly less distracted and followed the instructions below to a tee. And of course it worked.

How to Pop Perfect Popcorn on the stove! – Simple Recipes

SweetSaltyPopcorn-Published

Sweet and Salty Popcorn (servings: 6, cook time: 25 minutes)

Ingredients

  • 2 cups popped kernels
  • 1/3 cup coconut oil
  • 1/3 cup coconut sugar (barely increases blood sugar)
  • 1 tsp vanilla
  • 1/2 cup honey
  • 1 tsp cinnamon
  • 2 Tbsp sea salt

Instructions

  1. Pop the popcorn in an air popper or over the stove.
  2. In a small saucepan, melt the coconut oil and coconut sugar. Stir in the vanilla, honey, and cinnamon. Stir frequently. When it reaches a boil, remove from heat.
  3. Pour the liquid mixture over the popped popcorn. Add the salt on top. Mix gently with a wooden or plastic spoon so you don’t crush the kernels.
  4. Lay popcorn out on a baking sheet and refrigerate for 15 minutes or until hardened.
  5. Break off the sheet and serve. Enjoy! It will keep a couple of days until the popcorn goes stale.

Ashley Life Update:

Vitamix


We went and got the Vitamix last night! I’m so flippin’ excited. My week is insane so I won’t have much time to experiment but I’ll be using it whenever possible and I’m sure you’ll all be hearing about it. Also, we found a fantastic deal on Stainless Steel cookware. 20% off and a rebate for a Cuisinart bowl set. It’s gonna take a little bit of saving to bounce back but I am SO excited to use this stuff. This night was better than Christmas. YAY!


Thriving Thursday: What’s in Your Microwave?

I’m not sure when or how the thought entered my head. I don’t know if my super health conscience Momma put it there or if it was the stirrings of the health community in general, but it’s time to make a change. A big one. I’m going to throw away our microwave. *GASP!*

Microwave

I did a lot of research for this post. I checked out articles from Harvard Med, GreenMed, New York Times, and Dr. Mercola, among others. People are divided. These very smart, highly informed sets of people can’t agree: are microwaves bad for you or not?

This is how it is now, though. Our current system doesn’t work. People are sick and more people are dying prematurely than ever before. I don’t believe we can implicitly trust the medical model for anything other than emergency care, but then who can we trust? How the heck do you figure out who’s right?

I know this sounds a little wonky but I tend to trust my instinct. If you put your face too close to a microwave, you will absorb small amounts of radiation, this is known. But your food is in there! Your food is being heated up in that box full of radiation. Then you’re gonna eat it! Doesn’t that seem a little backwards? However, I know most people don’t make their judgements based on my own personal judgement so here are the facts as well as I can decipher them (with a few opinions thrown in):

How it Works:

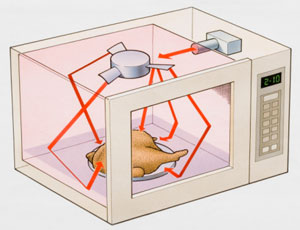
Microwave ovens heat food with oscillating electromagnetic waves. The waves energize the water molecules in your food. The polarized water molecules bounce off each other causing friction. That friction heats up the food. Microwaved water heats much more quickly than conventional methods resulting in shorter cooking times.

This form of cooking heats the food from the inside out. But wait a minute. I mean from the inside of the molecules on the outside of the food. It break and reforms the water molecules on the outside of the food in the heating process. Sometimes the distribution of water molecules is uneven which is why you sometimes get microwaved “hot spots.” Conventional cooking heats differently, from the outside of the molecules in.

Part of the opposition’s argument is that less heating time means higher nutrition retention. In general, I agree, but it’s not the length of the heating with microwave ovens, it’s the type of heating that’s the problem. If these electromagnetic waves can reach the interior of the food molecules, what else are they changing other than just the energy of the water?

Radiation:

When I was little I LOVED to stare into the microwave and watch the food spin around in circles, ever so slowly. Every time an adult caught me they slapped my hand and told me to back away, this crazy stuff called radiation leaked from that thing and you didn’t want it getting into your brain!

Since they were invented, the FDA and other regulatory organizations have closely monitored the manufacturing of microwave ovens. There have been major improvements in the level of radiation emitted from the ovens. This is good. However, radiation doesn’t die, it accumulates. So depending on how frequently you use your oven and how old it is, your kitchen is very likely full of microwave radiation. This is bad. Also, the adults were right, the radiation increases exponentially as you move closer to the source and it’s more easily absorbed by your eyes. Don’t sit and watch that plate spin!

Also, a recent study by Dr. Magda Havas of Trent University tested the effects of certain frequencies of radiation on the heart. She concluded that 2.4 GHz of radiation (which is emitted by microwave ovens AND wi-fi routers) changes the heart rate and heart rate variability. Scary.

Nutrients:

As mentioned before, my common sense tells me that if microwaves can break apart and alter water molecules, what are they doing to the very delicate nutrients and minerals in our food? It is now well known that our food has lost a significant percentage of nutrients compared to food produced in the early 20th century. Crappy soil, terrible manufacturing methods, and tons of pesticides definitely play a part in this decline, but how big a role do microwaves play?

  • A study published in the November 2003 issue of The Journal of the Science of Food and Agriculture found that broccoli “zapped” in the microwave with a little water lost up to 97 percent of its beneficial antioxidants. By comparison, steamed broccoli lost 11 percent or fewer of its antioxidants. There were also reductions in phenolic compounds and glucosinolates, but mineral levels remained intact.
  • A 1999 Scandinavian study of the cooking of asparagus spears found that microwaving caused a reduction in vitamin C.
  • In a study of garlic, as little as 60 seconds of microwave heating was enough to inactivate its allinase, garlic’s principle active ingredient against cancer.
  • A Japanese study by Watanabe showed that just 6 minutes of microwave heating killed 30-40 percent of the B12 in milk .
  • A recent Australian study showed that microwaves cause a higher degree of “protein unfolding” than conventional heating.
  • Microwaving can destroy the essential disease-fighting agents in breast milk that offer protection for your baby. In 1992, Quan found that microwaved breast milk lost lysozyme activity, antibodies, and fostered the growth of more potentially pathogenic bacteria.

While many of these studies were done using older microwaves, the evidence is clear. Microwave ovens ARE NOT a healthy way to heat your food. If you want to retain the precious nutrients still left in modern produce, eat it raw or heat it from the outside in.

* Word to the wise: If you continue to use your microwave, NEVER heat anything in a plastic container. It is undisputed that the toxic chemicals from the plastic heat and leach into your food not only killing nutrients but filling you up with lots of really terrible chemicals.

GAH! What do I do with all this information? I’m just going to cite Dr. Mercola on this one:

“Am I asking you to toss your microwave oven into the nearest dumpster? Not necessarily. It can be a useful tool for cleaning. But if real estate in your kitchen is at a premium, it should probably be the first thing to go.

You really CAN survive sans microwave—people are living quite happily without one, believe it or not. You just have to make a few small lifestyle adjustments, such as:

  • Plan ahead. Take your dinner out of the freezer that morning or the night before so you don’t end up having to scramble to defrost a 5-pound chunk of beef two hours before dinnertime.
  • Make soups and stews in bulk, and then freeze them in gallon-sized freezer bags or other containers. An hour before meal time, just take one out and defrost it in a sink of water until it’s thawed enough to slip into a pot, then reheat it on the stove.
  • A toaster oven makes a GREAT faux-microwave for heating up leftovers! Keep it at a low temperature — like 200-250 degrees F — and gently warm a plate of food over the course of 20-30 minutes. Another great alternative is a convection oven. They can be built in or purchased as a relatively inexpensive and quick safe way to heat foods
  • Prepare your meals in advance so that you always have a good meal available on those days when you’re too busy or too tired to cook.
  • Try eating more organic raw foods. This is the best way to and improve your health over the long run.”

I hope you’re all having fantastic days! Just let me know if you have any questions. Love and hugs – Ash

Sources (articles):
Why Did the Russians Ban An Appliance Found in 90% of American Homes? – Mercola.com
Studies Show Microwaves Drastically Reduce Nutrients in Food – GreenMedInfo.com
The Claim: Microwave Ovens Kill Nutrients In Food – New York Times
Do Microwave Ovens Destroy Nutrients? – Livestrong.com
Microwave Cooking and Nutrition – Harvard Medical School

Sources (studies):
Vallejo F, Tomas-Barberan F A, and Garcia-Viguera C. “Phenolic compound contents in edible parts of broccoli inflorescences after domestic cooking”
Kidmose U and Kaack K. Acta Agriculturae Scandinavica B 1999:49(2):110-117
Song K and Milner J A. “The influence of heating on the anticancer properties of garlic,” Journal of Nutrition 2001;131(3S):1054S-57S
Watanabe F, Takenaka S, Abe K, Tamura Y, and Nakano Y. J. Agric. Food Chem. Feb 26 1998;46(4):1433-1436
George D F, Bilek M M, and McKenzie D R. “Non-thermal effects in the microwave induced unfolding of proteins observed by chaperone binding,”
Quan R (et al) “Effects of microwave radiation on anti-infective factors in human milk,” Pediatrics 89(4 part I):667-669

Tasty Tuesday: Honey Yogurt Dip

We had some people over on Saturday. A melting pot of people from all the different areas of our life. We ladies had some fun with makeup (more on that Friday) while the guys watched basketball. Then we all went line dancing! I’m getting pretty good at it by now.

So for the get together at our place, I decided that I would cook appetizers. I settled on 4 relatively simple recipes. When people started arriving and I was only half done cooking, I realized I may have been a bit ambitious. BUT, I did discover this amazing recipe. It took a total of 3 minutes and was one of the tastiest things on the table.

YogurtHoneyDip-Published

Honey Yogurt Dip

Ingredients:

  • 1 cup plain yogurt (organic and/or goat is better, raw is best)
  • 2 Tbsp honey (local is best)
  • 1/4 tsp vanilla (optional)
  • Any fruit that’s in season

Instructions:

  1. Cut up your fruit into bite-sized pieces.
  2. Mix remaining ingredients together and serve!

Also, it snowed here again! About 5 inches in 24 hours. I had the day off and managed to catch the flu so it was the perfect weather to snuggle up on the couch, watch marathon TV, and drink pots of tea. But just to prove how amazing the Midwest is, a random, kindly citizen cleaned off my car! There is no way for me to know who did it so they just did it from the kindness of their heart. Peoria really isn’t so bad 🙂

Snowed In


I hope you’re having a happy day. Love and hugs – Ash

Thriving Thursday: Grocery Shopping Guide

In talking to people all over my community, I’ve discovered that very few of them know how to grocery shop. We have SO many options. When you’re trying to get healthy, what’s the right brand of healthy to buy? This is a simple beginner’s guide to healthy grocery shopping.

So here is a set of rules to help you navigate more quickly through the maze of choices.

photo 10

1. Always start with the whole foods. Start in the produce section and let yourself salivate over the deep orange bell peppers or in-season strawberries. If your store has them, move on to the bulk seeds and nuts. Then peruse the other sections, skipping processed foods whenever possible.  Focus your efforts where you can find the most nutrients: in whole foods!

SalsaNutritionPanel

2. Check the INGREDIENTS not the nutrition panel. Only buy processed food that you can’t find in a whole food form. We have been trained to look at the nutrition panel on all packaged foods. How many calories, how much fat, and sodium, etc. But new research and my personal observation shows that it’s the ingredients that matter, not the nutritional breakdown. The fewer ingredients the better and make sure you can recognize the name of everything in the processed food you’re eating.

photo 7

3. Avoid sugar like the plague. When you start looking at ingredients in processed food, you’ll notice that sugar is added to EVERYTHING. Check out this post for why sugar is bad. Aside from the obvious “sugar,” Anything ending in “-ose” is sugar including sucrose, fructose, and glucose. Any “gum” is considered sugar including lecithin gum and xanthan gum. And any kind of “syrup” is sugar including brown rice sugar. And finally, ASPARTAME IS EVIL. It’s a neurotoxin. Check the post mentioned above for more info.

photo 2

4. NEVER buy “low-fat” or “reduced fat” or “1%” fat or any product from which they’ve removed the fat. This includes milk. Buy whole milk! when manufacturers remove the fat, the concentration of sugar in the substance is even higher. They even add sugar sometimes (!) because the product tastes so bad without its natural fat. Seriously. So it has higher sugar content but a lot of those fats are actually very good for you. They are necessary for your bodies proper function. So just keep the fat in!

There are only a few guiding principles to the beginner’s healthy shopping but man they are whoppers. Budget double the time it normally takes you to shop, at least until you can find the brands you like. Once you’re adjusted you’ll zoom through the grocery store once again!

I hope you’re all having fantabulous days. Love and a big smile 🙂 – Ash

Tasty Tuesday: Banana Nut Bread

This bread is delicious. Really, really good. It’s moist and naturally sweet; and the texture is like butter in your mouth. Yummy. It can take up to 45 minutes to prepare and an hour to cook so do it on a Sunday and make a big batch. It freezes really well so leftovers are a good thing!

I found the recipe on another blog (Skinny Ms) and then tweaked it a bit. I took out the stevia and oat bran and added gluten-free oats and walnuts.

Because it’s high in protein, sugar-free, and very low in grains, you can eat it any time of day. We had it last night for dessert and this morning for breakfast. Toast it for a few minutes for an even more satisfying experience.

photo

Banana Nut Bread

Ingredients

  • 2 granny smith apples
  • 3 very ripe bananas
  • 8 Tbsp. olive oil
  • 2 eggs
  • 1/4 cup almond milk
  • 1 cup almond meal/ almond flour
  • 1 cup whole, gluten-free oats
  • 1 tsp. baking powder
  • 1 tsp. cinnamon
  • 1/4 tsp. nutmeg
  • 1/2 tsp. vanilla extract

Instructions

  1. Preheat oven to 180°F. Lightly coat loaf pan with 1/2 Tbsp. olive oil.
  2. Peel, core, and dice apples into small pieces. Sauté with 1/2 tsp. cinnamon on medium heat until brown (about 5 minutes).
  3. In a large bowl mix together the almond meal, oats, baking powder, remaining cinnamon, and nutmeg. Set aside.
  4. In another bowl mix olive oil, eggs, almond milk, and vanilla.
  5. Slowly add the liquid mixture to the dry mixture (in about 4 batches).
  6. In the now empty liquid mixture bowl, mash all 3 bananas.
  7. Fold bananas and apples into the large bowl mixture.
  8. Spoon into the loaf pan. Cook for about 50 minutes or until a wooden skewer or toothpick comes out clean.
  9. Let cool in pan and then enjoy!

I highly recommend this one. It really is delicious. Let me know how it goes! A big hug and a smile. – Ash


Thriving Thursday: Mom’s Shepherds Pie

Happy Thursday to you all! It’s almost the weekend and I’m excited about it. This last couple months has been absolutely crazy at work. It’s really wonderful to see so many people starting their path to health but I’m a little glad that it’s starting to taper now. I was starting to miss my relaxation (and cooking) time. So here is a great recipe directly from my Momma’s kitchen.

My mom is a fabulous cook. She claims to hate it but how can you hate something you’re so good at?? I think she gets tired of cooking every single night (who wouldn’t) but goodness knows we would have been a MUCH less healthy family without her daily meals.

She is one of those people who can whip up a meal when the fridge and pantry are completely empty. If friends stop by for a chat, she has the most creative and delicious appetizers on the table within 5 minutes. She has mastered the art of feeding AND socializing with people. Those who have tried it know how hard that can be.

She taught me this recipe before I left for college and it quickly became my signature dish. She uses mashed potatoes from the box (understandable with 4 kids and no time) but I love mashing potatoes. They taste better and I get to let out my pent-up aggression on them. So I turned to my friend Alex for some further input. She is also an amazing chef and trained in the art of food.

So here is my combination from the two lovely ladies. My mom’s was quicker but slightly healthier and Alex’s was a little more time-consuming but richer and more savory.

ShepherdsPie-Published

Mom’s Shepherds Pie

Note: This is a delicious dish but if you’re trying to lose weight, do not eat it for dinner. You don’t want the potatoes sitting in your stomach all night. Unless you use the energy, it will turn into fat.

Ingredients:

  • 5 medium potatoes
  • 1 cup organic butter
  • 1 cup milk (unsweetened almond, coconut, whatever…)
  • 1.5 lbs ground turkey
  • 2 Tbsp high heat oil (like coconut or grape seed)
  • 1 onion
  • 3 carrots
  • 1 zucchini
  • 4 cloves garlic
  • 1 cup gravy (I use Bisto but it contains trace gluten so be careful)
  • salt and pepper

Instructions:

  1. Preheat the oven to its lowest setting.
  2. Chop potatoes into small pieces. Boil them in a large pot of water until soft when stabbed with a fork.
  3. While they’re boiling, chop the onion, carrots, and zucchini.
  4. Drain the potatoes and mix in a large bowl with butter and milk. Mash them all up! Set aside.
  5. In a large pot (yes a large pot) sauté the onions, carrots, and minced garlic on medium heat. Cook until onion is transparent, about 5 minutes.
  6. Add turkey and zucchini to the skillet. Cook for 5 minutes then add gravy. Continue to cook until meat is browned.
  7. Spread out the turkey mixture evenly in the pot then layer the potatoes on top.
  8. Heat in the oven for 5 minutes to let juices mix.
  9. Enjoy!

I hope you’re all having wonderful days. Love and a grin. – Ash


DIY Friday: Meal Planning Board

So you’re trying to eat healthy? I bet you have tons of people in the wellness community telling you “it’s really not that expensive!” Well they are wrong. Eating healthy can be VERY expensive. To keep the cost manageable you have to do a lot of planning. You have you cook most of your own food and you can’t have any food waste. Unless you plan, IT IS time-consuming and expensive.

Mike and I have been gradually increasing our health factor over the last several months while trying to keep costs low. We have set up a system where, whenever either of us buys food, we put the receipt on the coffee table for the other to review. It holds us accountable and makes us analyze where money could be better spent.

Then I meal plan. I’m very organized and love to plan ahead so this isn’t too hard for me but I was lacking the necessary tools. That’s why I made this bad boy. My meal planning board.

photo 1 copy


My dinner system:

  • Cook double-portions every other day. This means only cooking from scratch 3 times a week! I cook half the meal only partially so it’s not overcooked when I reheat it for dinner the next day.
  • Eat leftovers on the days I don’t cook.
  • Have our “vacation meal” on the seventh day.

It’s quick and means that I can buy more in bulk. Our breakfast is the same every morning (Grainless Granola) and each of us takes care of our lunch separately. It’s a pretty nifty system but I was getting really confused about which meals I was going to cook and which food I needed on my weekly grocery shop.

So during our Simple Sunday this past weekend, the weather was nice enough to paint out on the porch. I finally did my Meal Planning board and I love it!

Supplies:

  • Pretty frame (mine was $5 at Goodwill)
  • Spray paint (for color)
  • Spray paint (for chalk or whiteboard coating)
  • clothespins
  • some cardstock to label the pins
  • fabric to hold the labels
  • hot glue gun
  • a little sandpaper to prep the frame glass
  • painters tape (if you want to do a pattern)
  • an old sheet to protect your floor

Instructions:

photo 2^ Make sure you have a surface to stick the pins to. This frame had lots of dips in it so I blocked it out with some chips of cardboard I had in the recycling bin.

photo 3^ Separate the frame and glass. Sand the glass so it will hold the paint. Spray down all pieces with however many coats they need. *I started with chalkboard paint but it didn’t work all that well. I went back and exchanged it for whiteboard paint and repainted the glass.

photo 4< If you want to paint a pattern, wait until the base layer is dry and then tape it off and spray. *I originally had yellow stripes in mine but it was just too much with the raised dots AND baby yellow. After I finished it I went back and repainted it all white.

Stick the clothespins down with hot glue. If that doesn’t hold, graduate to the messier but much stronger Gorilla Glue.

photo 2 copy^ Cut out your cardstock. And write out any of your favorite dishes. Hot glue your fabric pockets to store them in. Then label the pins with the same cardstock. Mine are for each day of the week and then Snacks to take to work for that week. Here’s the template I made for my labels:  MealBoardLabels

Another idea, for complicated meals, write the ingredients on the back of the card so you don’t have to look back to the cook book every time.

photo 1 copy

And now you have a meal planning board! I’ve only been using mine for a week and I already love it. It takes the strain out of meal planning and makes cooking SO much easier. I will say it looks a little sad and bland with all the white and gray but I’m hoping I can paint the walls our next kitchen so it will just be a pretty accent on a sunny yellow wall. 🙂

Let me know if you have any questions. And HAPPY FRIDAY! Love and a toothy smile. – Ash


Thriving Thursday: A Different Cook In My Kitchen??

Last night I had a visitor. His name was Dave. I’ve met him twice before. He knocked on my front door, unloaded his tools, and took over my kitchen! It was an odd experience but definitely an enjoyable one. That’s because he’s a SaladMaster Chef!

Now I’m not one to advertise for other people. It’s annoying, I know. But this company is awesome. I love their product and their way of advertising. I’m not getting any kickbacks or freebies for telling you this, I just think you should know.

photo 1

I enter drawings at all the festivals and expos I work and I finally won 🙂 SaladMaster is an elite brand of cookware. Now I know that sounds lame but it was seriously awesome (even Mike thought so). Their cookware is surgical stainless steel and, therefore, doesn’t leach any toxins into your food. He did an experiment with baking soda that showed just how much crap our other cookware put into our food. It was gross.

The other cool thing is that the pots and pans are designed to seal when they heat up so the little pot became like an oven. It heats all the food in half the time and keeps it under 182°F. This means that it loses very little nutrients in the cooking process but anything it does lose, it just circulates back in!

So Dave cooked for us while we sat with wine in hand and watched him. Check out the amazing meal he cooked us in 30 minutes (including the cake). 30 MINUTES!

photo 2

Because it’s so nice and has a lifetime warranty, this stuff is VERY expensive. Like take out a loan expensive. But for what we spend on healthy groceries, Mike and I are considering it an investment. We’re going to save for the next couple months and see what we can afford. Until then I’m going to be cooking in my pots and pans with a grimace on my face. Haha.

The great thing is that he did give us some freebies for having the dinner. Some bakeware that I’ll be using as much as possible instead of our current pots and pans.

Note to Peoria residents: I’m in the process of setting up our next dinner, but this time I’m going to invite some friends (more freebies!). A free healthy meal and a night with Chef Dave. It will also be a full education on American cookware and how SaladMaster fits into that equation. If you want to come, let me know, I’ll make sure I include you. And yes that means you PFC patients. Anyone is welcome.

I hope you’re all having very happy days. Love and a big grin. -Ash